
Looking at some of our previous articles you might have guessed that How much do we love Python. And we are not alone here as the world is moving towards Python development.
Companies like Google, Instagram, Uber, etc depend largely on Python. The language has seen a huge growth in the past 5 years after the trend set by Machine Learning and AI. We have shared articles both on the YouTube channels to learn Python or if you want to get free courses for Python.
In this article, we will be looking at the Introduction to MongoDB ppt and its database driver PyMongo. We will be moving into the article step by step with proper code examples to support the instructions.
The first step to MongoDB is to know what is SQL and NoSQL, So let’s get started.
What is NoSQL?
NoSQL is a database that is generally used to store unstructured data. Earlier data was mainly stored in a tabular form comprising rows and columns. SQL was used to handle the structured data in the past. You can look at the list of our free SQL courses to learn the language effectively.
With the advancement in technology, developers moved to a more flexible database. NoSQL stored the data in the form of documents. This helps in managing a large amount of unstructured data easily and effectively.
We used Relational Database Management Systems to work on SQL which was quite good for small data packages. As the companies are collecting much-unstructured data it became almost impossible to handle it with SQL as a whole.
Some important Features of NoSQL Database
- No need for defining the structure at the beginning
- The form of data is nonrelational which means the data flow is not directional.
- Every other record can have its own different substructure
- Mainly stored in Key-Value format.
- Can be scaled horizontally without degrading the performance.
Now you are known to the NoSQL database we will be looking at MongoDB.
What is MongoDB?
MongoDB is a NoSQL, Open Source, Cross-Platform, Document Oriented Database system. It stores data in key-value pairs rather than traditional row columns and tabular approach.
Companies are moving to MongoDB architecture because it provides a scalable database with ultimately high performance. Most of the latest programming languages use object functions and the earlier database approaches were not able to store objects directly much efficiently.
MongoDB deals in Document-Collection storage which can store objects directly. It makes the process of developing robust applications very much easy.
Here are some amazing features of MongoDB:
- The content management is Semi-Structured
- Most of the standard query types are supported
- The system is highly flexible and portable
- Easily scalable by adding more machines and documents.
- It is not mandatory to keep similar fields in documents
- Document structure could be easily updated
- Better Memory management than traditional RDBMS
- Works under automatic failure support
- MongoDB support multiple storage engines to store data efficiently.
Organizations using MongoDB
Due to its scalability and high-quality performance, many large enterprises adopt it on the go. Below are some big business houses that are running their data storage on MongoDB.
1. Craiglist
2. Disney
3. SourceForge
4. Business Insider
5. LinkedIn
6. Adobe
7. eBay
There are thousands of other companies that rely totally on MongoDB for database operations. Now we will be looking at PyMongo, a MongoDB driver used in Python language.
You can download MongoDB from here: MongoDB Download
What is PyMongo?
PyMongo is the official driver for running MongoDB code in the Python environment. You can go through this article for learning MongoDB. The code we write uses PyMongo as a connection between the environment and the database. We will be looking at some code to learn some basic operations with PyMongo in Python.
Any Python IDE could be used but here we are using Jupyter Notebook for running up the codes.
1. Installing PyMongo
By running the following code we can easily install PyMongo through pip.
pip install pymongo
2. Importing PyMongo
import pymongo
3. Python MongoDB Connection with MongoClient
We need to create a connection with MongoClient to create a MongoDB instance. This is the first step to use PyMongo in Python environment.
from pymongo import MongoClient
client = MongoClient()client = MongoClient('localhost', 27017)
or
client = MongoClient('mongodb://localhost:27017/')
Output Screen:
 |
| Creating Connection with MongoClient |
You can use any one of the above commands to connect the system to the localhost connection.
4. Checking All Available Databases
Run the following code to get all available databases in your connection.
dbnames = client.list_database_names()
dbnames
It will return all the databases present in your current connection. You will also find the default database which is created while installing MongoDB.
5. Creating a Database
New Database can easily be created with the help of MongoClient.
mydb = client["mydatabase"]
6. Deleting a Database
Any prebuilt PyMongo database could be deleted with the following code:
client.drop_database('mydatabase')
dbnames = client.list_database_names()
dbnames
7. Create Collection in a Database
A database can contain multiple collections having different attributes. You can create one using the code below
mydb = client["mydatabase"]
mycol = mydb["customers"]
8. Inserting Document in Collection
There are two main options to insert documents in the collections. Either you can insert single entry at a time or you can insert multiple entries in the PyMongo collection. Here how its done:
Inserting Multiple Entries
mylist = [{ "name": "Ram", "address": "Highway 37", "Phone no": 9998887776,"Salary": 20000 },
{"name": "Rahul", "address": "Jaipur", "Phone no": 9998087776,"Salary": 15000 },
{"name": "Bhawana", "address": "Gujrat", "Phone no": 90998887776,"Salary": 30000 }]

x = mycol.insert_many(mylist)
Inserting One Entry
mydict={"name":"Tarun","address": "Mumbai", "Phone no": 9990087776,"Salary": 29000}
y = mycol.insert_one(mydict)
Inserting By Providing Ids
By default PyMongo provides uniqe ID to each element but you can also provide them yourself.
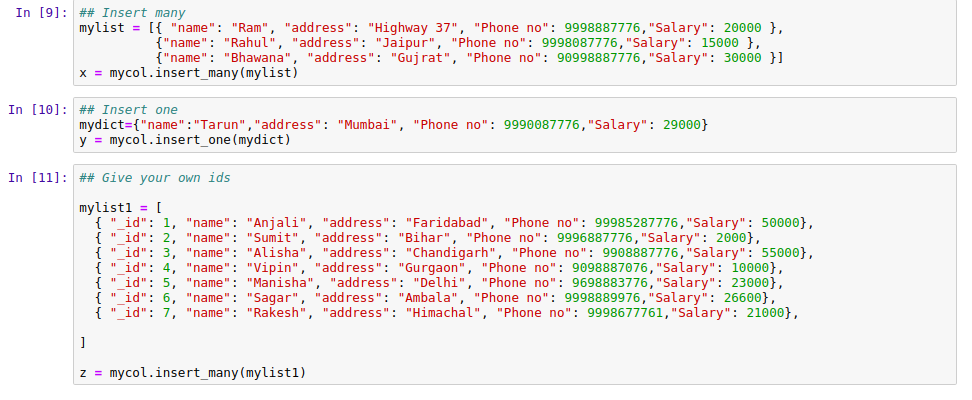 |
| Inserting Documents in Collection |
9. View Data From Collection
You can view data in multiple manners and this is what makes MongoDB and PyMongo an ultimate Python function. This way all our collections and documents can be easily viewed in multiple ways.
Viewing Single Row: You can view a single row using find_one() function. It will only return the first row of document.
Viewing All Rows: View all rows using find_many() function.
Viewing only a few Rows: View only selected fields by providing 0 to the ones we want to hide and 1 to those which we want to see.
for x in mycol.find({},{ "_id": 0, "name": 1 ,"address": 1 }):
print(x)
Output Screen:
 |
| Viewing Data in PyMongo Python |
10. Filtering Data in PyMongo
PyMongo makes it very much easy to filter data and there are many ways to perform it. One way is to filter data based on the field and its value. Look at the below code and output:
myquery = { "address": "Gurgaon" }
mydoc = mycol.find(myquery)
for x in mydoc:
  print(x)
The data can also be filtered by Advanced queries like the one we have used below:
myquery = { "address": { "$gt": "G" } }
mydoc = mycol.find(myquery)
for x in mydoc:
  print(x)
Here we have used “$gt” for finding all the values greater than the specific attribute. There are other modifiers as well:
GT- Greater Than
LT – Less Than
ET – Equal To
Data can also be filtered with the help of Regular Expressions and here is the code for performing that:
myquery = { "address": { "$regex": "^G" } }
mydoc = mycol.find(myquery)
for x in mydoc:
  print(x)
Output Screen:
 |
| Filtering Data PyMongo Python |
Here we have filtered the data and selected on those elements which start with the letter ‘G’.
11. Querying with ObjectID
We can easily fetch data with the ObjectID which is a unique identifier for each element.
import pprint
pprint.pprint(mycol.find_one({"_id": 1}))
12. Counting Documents
In MongoDB, the rows are known as Documents and Columns are generally stated as collections. So we are counting the number of Documents(Rows) in our collection.
13. Sorting Documents
Data can be easily sorted with the help of sort() function. The default case for sorting is in ascending order but we can always change that by providing a parameter ‘-1’.
mydoc = mycol.find().sort("name", -1)
for x in mydoc:
   print(x)
Output Screen:
 |
| Sorting Documents in PyMongo Collection |
14. Updating Documents
Any field could be updated with PyMongo clients in just a few lines of codes. Either you can update a single row at a time or update multiple rows at ones.
Updating Single Row
myquery = { "address": "Ambala" }
newvalues = { "$set": { "address": "Goa" } }
mycol.update_one(myquery, newvalues)
for x in mycol.find():
   print(x)
Updating Multiple Rows
myquery = { "address": { "$regex": "^G" } }
newvalues = { "$set": { "address": "Haryana" } }
x = mycol.update_many(myquery, newvalues)
for x in mycol.find():
  print(x)
Output Screen:
 |
| Updating Documents in PyMongo Collection |
Here we have changed the value of the address to Haryana in all the fields whose address value starts with ‘G’.
15. PyMongo Limit
The function limit( ) is used to limit the number of rows we are currenty accessing or viewing.
myresult = mycol.find().limit(5)
for x in myresult:
print(x)
16. Deleting Documents
We can delete the number of inserted rows in our collection anytime. Function “object.deleted_count” can be used to get the number of deleted rows.
Deleting One Document(Row)
myquery = { "address": "Ambala" }
y=mycol.delete_one(myquery)
print(y.deleted_count, " documents deleted.")
Deleting Multiple Documents(Rows)
myquery = { "name": {"$regex": "^A"} }
x = mycol.delete_many(myquery)
print(x.deleted_count, " documents deleted.")
Deleting All Documents (Rows)
x = mycol.delete_many({})
print(x.deleted_count, " documents deleted.")
Output Screen:
 |
| Deleting Documents from Collection |
17. Dropping Whole Collection
The whole PyMongo collection could be deleted by drop command as stated below:
So, This was all about MongoDB and its Python driver PyMongo which allows us to use MongoDB with Python. We have first seen the basic definition and then moved onto implementing the codes in our Jupyter notebook.
You can give a try to the above codes and do let us know in the comments if you face any difficulty. We will also be providing MongoDB and Python PDF soon on our Facebook page.